Hi Bloggers! Here some inspiration to get
your girlfriends together and have some fun Valentine's Day crafting, complete with
delicious treats, decorations, and plenty of holiday inspiration.
Host a Valentine's Day
Celebration
There's no better excuse than Valentine's Day to get your friends
together for some crafting fun. Grab your gal pals and share the
valentine-making with this simple guide to what to serve, craft, and have on
hand.
Valentine's Day Snack Buffet
Edibles at your crafts party should be easy and portable.
Champagne, nuts, candies, and cookies on a self-service buffet are simple for
the hostess to serve and easy for guests to nibble as they glitter and glue.
Paper Heart Garland
String a paper heart garland anywhere you like for a
sweet touch. Trace and cut out about seven hearts from 8-1/2x11-inch pieces of
construction paper or cardstock. Punch two holes about one inch apart in the
center of each heart. Thread a festive ribbon, string, or yarn through the
hearts as shown, and then hang.
Valentine's Day Flowers
Fresh flowers are perfect for Valentine's Day decor. Gather a
bunch of pink roses or tulips and place them in white vases for a
quick and simple display that looks elegant.
Jackie’s Tip: Use
floral foam or a floral frog (also called a kenzan, it's a metal device with
lots of sharp pins pointing upward) to keep flowers upright.
Dessert Tower
Create a decadent dessert tower. Use festive baking
cups to hold an array of bite-size treats, such as yogurt-covered
pretzels, nuts, chocolate, popcorn, and more. Or serve homemade treats and
choose a color scheme that
fits your personal style.
Chocolate Cherry Stack Cake
This scrumptious chocolate cake with cherry frosting makes a
beautiful display as well as a tasty treat for all of your
crafters-in-residence. Chocolate-dipped cherries provide the perfect garnish
for this sweet dessert.
Jackie’s Tip: Dip extra
cherries in chocolate and serve them as bite-size treats, or bundle them for
tasty party favors your guests can tote home with their crafts.
Red Velvet Whoopie Pies
Red velvet pies with cream cheese icing set a Valentine's Day
mood. These individual pies are just as tasty as a large cake but easier to eat
while crafting.
Valentine's Day Truffles
Keep your treats simple and delicious for this crafting party.
These decadent pink coconut and triple chocolate truffles fit the sweet holiday
theme and taste as good as they look.
Valentine's Day Cookie
Decorating
No Valentine's Day celebration would be complete without
heart-shape cookies. Serve
some them already decorated, but also leave some plain to let your guests
exercise their creativity. Send any leftovers home with guests as party favors.
Use your favorite sugar cookie recipe,
or tweak the traditional and try a fresh spin, like puffed-heart lemon cookies.
Beverage Station
Bottles of your favorite champagne, soda, or any other beverage
can nestle in ice near the snack buffet. Having the self-serve drinks close at
hand allow uninterrupted time with friends.
Organizing the Valentine's Day
Crafting Party
Good organization is the glue that holds a fun party together. Try
these tips for hosting your own crafts get-together:
-- Start small and keep it simple. Invite up to five enthusiastic
friends. You can always expand later if you want
-- Create some examples before your guests arrive to inspire them
and to make the crafting process easy.
Valentine's Day Crafts Table
Organization
To get the most out of crafting time, cut paper to card size and
lay out supplies before guests arrive. Or set up a separate area for supplies
so the crafting table doesn't get cramped. Include decorative-edge scissors to
allow guests to snip their projects to perfection.
Use Simple Containers
Gift tags and cards are popular Valentine's Day crafts, but all
the glitter, glue, and string can make a mess. Use simple vessels to contain
crafts supplies and to keep the crafting table as organized as possible.
Jackie’s Tips:
-- Provide guests with cups to
fill with crafts items that catch their eye.
-- Have some premade tags ready to decorate to get the crafting started.
Crafting Supplies Station
Crafts and conversation will be entertainment enough at this
Valentine's Day crafting party; just be sure to have enough supplies on hand.
We recommend: markers, string, ribbon, yarn, felt, glue sticks, hot-glue guns and
glue sticks, buttons, beads, rhinestones, markers, hole punches, plenty of
colorful paper, and decorative and plain scissors as well as anything heart
shaped (stencils, cutouts, etc.).
Jackie’s Tip: Have one person buy the craft supplies,
keeping the tab at $10-$20 per person. Others can reimburse her. This will
ensure a wide variety of supplies and less complication over who¿s bringing
what.
Share Valentine's Day Crafting
Ideas
Have crafters show off their adorable gift tags
and cards as they go. Encourage friends to bring some of their favorite
homemade or purchased Valentine's Day crafts for inspiration.
Jackie’s Tip: Craft
for a cause. Make Valentine's Day cards for local business owners, nursing
homes, shelters, and nonprofits in your area. You also can decorate donation
tins or send valentines to soldiers abroad.
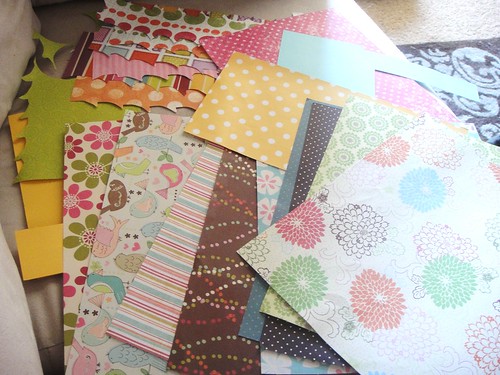
Valentine's Day Cards and Tags
Using a three- to four-hue color palette will ensure a professional and
impressive look for your projects. Keep reading for instructions for the
projects you see here.
Striped Heart Card
A simple pink card trimmed with decorative-edge scissors serves as
the base for this project. Top a slightly smaller rectangle of white cardstock
with strips of ribbon and colored paper. A cutout heart decorated with red
glitter and adhered with hot glue adds a finishing touch.
Jackie’s Tip: Use
sparkly or shimmery ribbon in lieu of strips of glittered paper. Your project
will be less of a mess to make, give, and clean up after. Rhinestones also add
a bit of bling.
Bow-Tie Heart Card
Use decorative-edge scissors to cut out a white background. then
glue a rectangle of blue paper cut slightly smaller on top. Apply glitter to a
heart cutout and adhere with hot glue. To complete the card, wrap it with a
decorative ribbon tied in a bow.
Wrapped Heart Tag
Cut a heart from felt or paper (felt provides a more dimensional
look) and adhere it to a tag with hot glue. Place a brad near the top of the
heart to keep it secure. Use decorative-edge scissors to cut a contrasting color of
felt or paper to embellish the heart.
Red-and-White Heart Gift Tag
A graphic background makes a bold impression on this heart gift tag. Use a premade tag or cut one from a
bold-pattern paper. Punch a hole in the top and attach string. Trace and cut a
heart with an empty center from felt or paper. Attach it to the gift tag. Cut a
smaller heart to place inside the first heart.
Button Heart Tag
Rhinestones add a bit of bling to this handcrafted gift tag. Cut out a gift tag shape from striped
paper, or choose a premade tag with a cute background, punch a hole in the top,
and thread with ribbon. Hot-glue a small felt heart to the center of the tag.
Attach rhinestones in a vertical line above and below the heart. Use a sturdy
needle and thread or hot glue to attach the heart button to the middle of the
felt heart.
Striped Gift Tag
Start with a plain white tag, then make the stripes with markers,
ribbon, and paper. (Use a ruler if you'd like perfect lines.) Use a variety of
widths for the stripes to punch up the fun factor, and adhere the ribbon and
paper with glue. Don't forget to punch a hole for the hanging ribbon and add a
sweet pink heart to give the tag gift-worthy status.
Pink Paisley Gift Tag with Blue
Heart
The blue felt heart accent is a standout on a pink paisley
background and makes this Valentine's Day gift tag really pop. Cut a tag
out of paisley-print paper, or use one that's premade, and thread a string
through a punched hole.
Cheers,
Jackie
Credits: Better-Home & Gardens


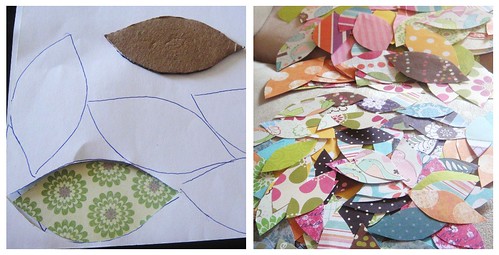
 Hello lovelies! I hope your week is going swimmingly so far. Today I'm bringing you a little tutorial to show you how to make some sweet Decorative Wooden Clothespins that you can use to adorn inspiration wires, gifts and more. I hope you will enjoy making your own variations of these pretty little clips.
  To begin with you will need to follow this awesome tutorial to create your fabric pom pom flowers (follow Tutorial II). They are rather addictive to make and super easy (even my 11 year old daughter made some. She turned hers into floral hairbands by stitching the finished flowers onto hair rubber-bands - and I'm planning to make a garland for my bedroom with the extra heap I've been making).

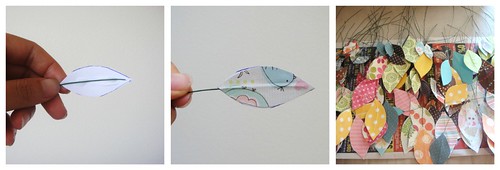
 These clips are even easier to make than the first version. A set of 10 can easily be made in less than 10 minutes. Fun!