
Here a lovely tutorial for you to do! I think you will Love it! :)
Materials you will need to create this Tag

- Dylusions Journaling Tags : Kraft #12
- Dylusions Stencils : Jay Silhouettes
- Dylusions Journal Insert Sheets : Black
- Dylusions Ink Sprays : Melted Chocolate, White Linen
- Dylusions Journal Block
- Dylusions Cling Mount Stamps : Love Struck Lucy
- Dylusions Paint Pens : White Linen, Black Marble
- Ranger Non-Stick Craft Sheet™
- Tim Holtz® Distress Collage Mediums : Matte
- Archival Ink™ #0 Pads : Jet Black
- Ranger Heat it™ Craft Tool
- Tim Holtz by Tonic Studios Non-Stick Micro Serrated Scissors, Paper Distresser
- Pencil and Eraser
- Single Hole Punch
- Craft Knife
- Permanent Ink Pen: Black
- Short Length Ribbon / Twine
- Poem: ‘Phenomenal Woman’ – Maya Angelou, 1978
Step 1: The first step is to make your kraft journal tag look grungy. Unscrew the top of the Melted Chocolate ink spray, and gently tap the end of the spray mechanism over the tag so that small drops of ink splatter randomly over its surface. The key is to be gentle: if the ink splatters are too big, they’ll distract from your writing.

Step 2: Let the ink dry – or use a heat tool to speed up the process – and then make splatters in the same way with the White Linen ink spray. I held up the tag vertically and tapped the back of it a couple of times after I’d used the White Linen spray to encourage the bigger ink drops to run.


Step 5: Cut out the small heart and stick it onto the silhouette with matte collage medium. Outline the edge of the silhouette with the White Linen paint pen. I found that rather than trying to outline with a single, constant line, it was far easier to do it using small, feathery strokes. When the collage medium is completely dry, add some white highlights to the stamped heart. Flip the tag over and outline the edge of the reverse side with the White Linen Paint Pen and the same ‘feathery strokes’ technique. Put the outlined silhouette to one side.

Step 6: Go back to your kraft journal tag and write out the poem in black permanent ink. I wanted it to look very natural, so I used my normal, everyday handwriting. I did a practice run on another tag beforehand so that I was confident the whole poem would fit.

Step 7: Finally, use a single hole punch to make a hole near the centre of the silhouette’s head, and fasten the silhouette onto the tag with a length of ribbon or twine that matches your tag’s colour scheme. You can see in the photo above that I went back to the silhouette and added a line of small white dashes inside the outlining I’d already done. It gave the silhouette more impact when it was resting against the kraft tag.

Cheers,
Jackie :)
By: Victoria Hill

Step 2: Let the ink dry – or use a heat tool to speed up the process – and then make splatters in the same way with the White Linen ink spray. I held up the tag vertically and tapped the back of it a couple of times after I’d used the White Linen spray to encourage the bigger ink drops to run.

Step 3: When the White Linen ink drops are dry, roughen up the edges of the tag with the paper distressing tool. When you’re happy with the degree of distressing, rub the Jet Black Archival Ink pad around the tag’s distressed edges. It doesn’t have to be really neat: a few accidental black ink marks on the tag just add to the grungy look. Put the tag to one side while you start work on the silhouette.

Step 4: Use a pencil to outline the large Jay silhouette onto the black Dylusions journal insert sheet. Carefully cut out the silhouette, using a craft knife for the trickier area near her legs. Stamp two or three of the smallest hearts from the ‘Love Struck Lucy’ set onto a piece of scrap kraft paper using the journaling block and Jet Black Archival Ink.

Step 5: Cut out the small heart and stick it onto the silhouette with matte collage medium. Outline the edge of the silhouette with the White Linen paint pen. I found that rather than trying to outline with a single, constant line, it was far easier to do it using small, feathery strokes. When the collage medium is completely dry, add some white highlights to the stamped heart. Flip the tag over and outline the edge of the reverse side with the White Linen Paint Pen and the same ‘feathery strokes’ technique. Put the outlined silhouette to one side.

Step 6: Go back to your kraft journal tag and write out the poem in black permanent ink. I wanted it to look very natural, so I used my normal, everyday handwriting. I did a practice run on another tag beforehand so that I was confident the whole poem would fit.

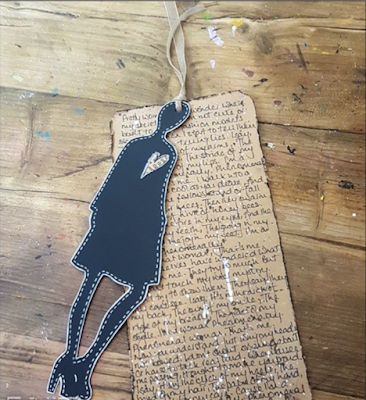
Step 7: Finally, use a single hole punch to make a hole near the centre of the silhouette’s head, and fasten the silhouette onto the tag with a length of ribbon or twine that matches your tag’s colour scheme. You can see in the photo above that I went back to the silhouette and added a line of small white dashes inside the outlining I’d already done. It gave the silhouette more impact when it was resting against the kraft tag.


Here are a couple of photos of the finished project. I love how the silhouette stands out against the handwriting on the distressed kraft tag, and the way in which the ink spray splatters give the tag a grungy, worn-in look.
I hope you’ve enjoyed seeing how I made this tag, and that it inspires you to do something similar with a poem that you love.
Cheers,
Jackie :)
By: Victoria Hill