Work with Pages and understanding Art Journaling

August 10, 2013

Maganizne-Mini Album Lazy Summer Iced Teas!

Hola Todos!
Espero esten disfrutando su verano Tanto como yo!  Aqui entre una cosa y otra tome un ratito para hacer este pequeno álbum! esta hecho de paginas de revistas viejas, algunos pedasito de papel and unos cuantos adornitos que tenia sueltos.  La cajita donde lo guarde, fue donde me hechron mi sandwich el otro día!  LOL  solo la recicle y adorne con algunas hojas sueltas!  Espero les guste!


Cheers,
Jackie :)

March 28, 2013

Im Back! With More Projects!

Hello Everyone

Okay we finally back after this GREAT vacations at the Vineyard!  From My trip Im bringing more great and super cool project and lots of Ideas to share!!  Also I will teaching at a "new" website dedicated to Crafts!  SO stay tune more info to come

Here one of our next projects!  Is super Funky!


and this too! Im trying to do some changes in my Studio!


And Here a short video from our Vacations!


http://youtu.be/d8hs_L2Woko
Cheers,
Jackie :)

March 13, 2013

All about Bookmarks!!

With mothers day and easter around the corner, bookmarks are an easy, affordable and totally customizable to the person receiving the gift.

These I just made I used velvet ribbon, I had on hand 16"
2 clamps for the ends
Old earrings and some other charms I founded at Michaels

A nice box and Viola' !!  Gifts were ready

Cheers,
 Jackie :)

March 11, 2013

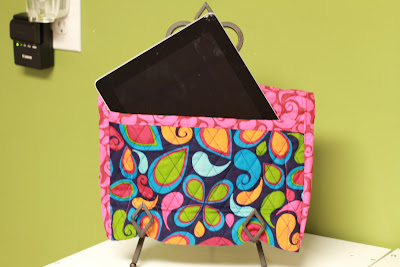
IPad Cover {Craft Project}

Hi Everyone
Here is our latest project!  A very cool and cute Ipad cover!  Have to inside Pockets for iPhone and room enough for a notepad too!

Final measurements  8.5 x 11
2 layers of Ruffles
2 Fabric Florets


Cheers,
Jackie :)

March 06, 2013

{Book Review & Giveaway} Happy Stitch: 30 Felt and Fabric Projects for Everyday -Free!!


Happy Stitch:30 Felt and Fabric Projects for Everyday by Jodie Rackley is a delightful book bursting with colourful and fun projects to make. Best of all, the projects can be easily constructed with felt, fabric, and floss - all you need is basic sewing skills, and you can be whipping up some modern and cheerful projects in next to no time!
 

The book includes a helpful section to get you started that explains the supplies you need and basic stitches and techniques used in the projects. Jodie also provides tips on how to personalise the projects to really make them your own. The book includes all the templates in the back, they do need to be enlarged. 


The projects are cute and whimsical and range from Gadget Cosies; Embroidered Totes; Pillow
Covers: Wearables; Softies; and many more. Many of the projects would make lovely handmade
gifts.  Some of the easier projects, such as the felt ornaments, would be perfect to inspire 
children and teach them a few sewing basics. 

Jodie Rackley is known for her bold use of colorful and simple designs, that comprise her 
handmade line, Lova Revolutionary. You can see more of Jodie's work on her blog,
Lova Revolutionary. 


I couldn't wait to get started, and made up the Owl Softie today (pictured below). The instructions 
were clear and easy to follow, with photographs showing how to construct the project, 
step by step.  


You can find Stitch Happy: 30 Felt and Fabric Projects for Everyday by Jodie Rackley at The Book Depository and Fishpond

NOW..If you Want to WIN a FREE Copy!!!

**To be in the running to win a copy of Stitch Happy: 30 Felt and Fabric Projects for Everyday, plus an Embroidery Bundle (including felt, fabric, and floss) ,  Leave a comment under this post and became a Follower of my blog!.

The lucky winner will be announce April 15!  Your gift to deal with the Taxes :)


Cheers,
Jackie :)
Credits: Review from Spoon full of sugar website

March 05, 2013

Macchiato ..Don't you will love one!


Sweet Indulgence  ....It is official I have a fatal attraction with Starbucks!!  This my Daily treat!!  

Why I love it..here is why!

The delicious, multi-layered Macchiato begins with milk steamed until it's stretched and smooth to bring out its natural sweetness and is topped by a dense, creamy foam. Then rich espresso is poured over and through the foam, where it mixes with the milk and creates a brown mark on top. Finally, the barista signs their work of art with a sweet drizzle in a crosshatch pattern—making sure you get a little taste of that gooey goodness with every sip.

OMG!  what not to love!!

Cheers,
Jackie :)

Spring Cards! Let your Imagination bloom!

Hi Everyone!
Here is some inspiration for some easy Spring/Eastern Cards, which you can make with basically scrap paper and couple of stamps

Hope this easy project inspire you to couple of cards :)


Cheers,
Jackie :)

March 03, 2013

Four Pocket Bag!

Happy Sunday!


Just came back from the Fabric store! as they were having 50% OFF event! I couldn't resist the temptation of getting some fabrics to put in practice some of the Sewing Classes lessons Im taking.  SO When I came home..with my new Purchase!  I looked at my Countertop at my Craft Room..and notice I had a project...waiting for me...and i just brought two more~  Hummm So what is the purpose, I said!! If I just keep buying and not actually finishing the project! Right?  ...well not..It is really fun to buy stuff  :)

Anyway I decided to finished my bag before i moved to my next project   ..and here is how it looks!  Is very very easy and simple ...It have 4 pockets! and I think is very cool..Well here is


Jackie :)

March 02, 2013

Easter Cards//Egg Shape

Happy Saturday everyone!

The other day i was at Michele's Store, and glaze these Egg-Shape cards..and tough it could be an easy easter Card project as the cards were already shaped..So I started to play with them and here are some simple cards


I Made the flowers on the 1 card using tissue paper ! they are cute right? and so easy to make..i will show later how make it, as Im planning to use this same technique to create some Mother Day cards ...

Stay tune !


Cheers,
Jackie :)

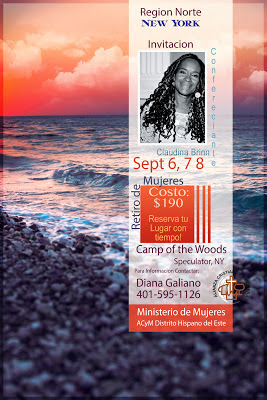
Poster Im creating

Hi Girls!
Some time ago I took a class with Jessica Sprague on Posters layouts...and finally I was able to put it in practice.  Our Team of Church leaders will be having a Women Retreat and i being playing a little with some posters for the event...

In my world poster should be eye catching and right to the point..I hate when I see posters with way to much information, as they distract me way to much from the real content...

Here are two on the Posters I just created, for this 2 posters I used Elements 10 and Many Layers Masks


Cheers,
Jackie 

February 28, 2013

Hello Darling! Missing me??

Hello my dear Followers

Snowblowers! what a joke!! we needed a Big Truck!!

Sorry I was MIA...a whole bunch of stuff was going on at home these days...From the Storm..Over 36 inches of show, no power, heat or water and stock in the house for over 4 days!  I know, it was bad !  Here take a look (below Pictures of before & after)!''....and then frozen pipes, broken pump and everything else in the middle....But Im back and I have couple of little and simple projects to share!!  for Easter and Mother Days!! Which are around the corner!!  So be ready to craft..as the journey start tomorrow again!
Too Much Show and I can't craft!! No POWER!!


My Driveway Before the Storm!

Same Drive way..after the storm!


Before the Storm

February 08, 2013

Make a Scratch-Off Hearts Card for Valentine's Day

Make this fun Valentine's Day card with our template, and type in your date-night choices. To finish the card, follow the easy steps below.
1. Download our template, available below. You can choose from a premade card or our template. Print the card onto cardstock and trim. Copy the card onto plain paper to get the heart template; cut out. Cut a strip of clear contact paper long enough to make four hearts. Trace around the heart template on the paper side of the contact paper.
2. To make the scratch-off solution, mix 2 parts metallic acrylic paint with 1 part dishwashing liquid. Using a small, flat paintbrush, apply a thin coat of the scratch-off solution onto the front side of the contact paper and let dry for an hour. Repeat with a second coat; add a third coat if your paint looks streaky.
3. Cut out the hearts (following the traced outline), peel off the backing, and place over the heart spaces on the card. Package the card with a new penny.
Here some details on how to make this Cute and Original card!


Here is another Option:

Here is the Card Template !

February 07, 2013

iPod/iPhone Holder Project


Hi Crafters!


Here is a super cool project! and who doesn't have an iPhone or an iPod these days! this cutie have a swivel hook that snaps onto jeans or totes, and will allow you to carry your music/phone where ever you go. You'll want to make oodles for gifts or fashion accessories in today's bright paisleys, polka dots, or florals.


What You Need:
  • 1/4 yard green print (bag fabric, lining)
  • 1/4 yard fusible interfacing 4 X 6" rectangle batting
  • 3/4"-long swivel hook
  • 3/4"-diameter button
Finished Project:
3 X 5 X 1/2"
Quantities are for 44/45"-wide, 100% cotton fabrics.
Measurements include 3/8" seam allowances unless otherwise stated. Sew with right sides together unless otherwise stated.
Cut Your Fabrics
To make the best use of your fabrics, cut pieces in the following order.
From green print, cut:
  • 4 -- 4 X 6" rectangles
  • 1 -- 4 X 41/4" rectangle
  • 2 of Flap Pattern
  • 1 -- 2-1/4" square
  • 1 -- 2 X 3"rectangle
From fusible interfacing, cut:
  • 2 -- 4 X 6" rectangles
From batting, cut:
  • 1 of Flap Pattern
Tip: A mechanical pencil always keeps a sharp point so it's a good choice for marking placement lines on an appliqué foundation or tracing around templates on fabric.
Download the iPod Holder Pattern
Make the Bag Body

  1. Turn under 1/4" on one short edge of green print 4 X 4-1/4" rectangle; press. Turn under again 1/2"; press. Sew through all layers 3/8" from second folded edge to make outer pocket (Diagram 1).
  2. Place outer pocket atop one green print 4 X 6" rectangle, right sides up; baste (Diagram 2).
  3. Fuse a 4 X 6" rectangle of interfacing to wrong side of one green print 4 X 6" rectangle to make an interfaced rectangle. Repeat to make a second interfaced rectangle. (Using interfacing will help the bag retain its shape.)
  4. Referring to Diagram 3, join outer pocket piece to one interfaced rectangle along side and bottom edges to make bag body.
  5. To shape flat bottom for bag, at one corner, match bottom seam line to side seam line, creating a flattened triangle (Diagram 4). Measuring 3/8" from point of triangle, draw a line across triangle. Sew on drawn line. Trim excess fabric. Repeat with remaining bottom corner to make bag body. Turn bag body right side out.
Assemble the Lining
Referring to Assemble Bag Body steps 4 and 5, sew together remaining green print 4 X 6" rectangle and interfaced rectangle, leaving a 2-3/4"-wide opening at bottom, to make lining. Do not turn right side out.
Assemble the Bag Flap

  1. Fold green print 2 X 3" rectangle in half lengthwise; sew together long edges with 1/4" seam. Turn right side out and press to make button strip. Aligning raw edges, place ends of button strip side by side at bottom center of a green print flap piece (Diagram 5); baste.
  2. Place batting on wrong side of remaining green print flap piece; baste. Join two bag flaps together along sides and curved end to make bag flap. Turn right side out.
  3. Quilt as desired. Deb machine-quilted the flap of this portable media player bag with diagonal lines spaced 1" apart.
Assemble Swivel Hook Strap

  1. Fold green print 2-1/4" square in half; join long edges with 1/4" seam. Turn strap right side out to make swivel hook strap.
  2. Thread strap through swivel hook ring; fold strap in half. Baste ends together.
  3. Align raw edges of strap ends along upper edge of bag back (Diagram 6); baste.
Finish Bag
  1. Center straight edge of bag flap along upper edge of bag back atop swivel hook strap; baste.
  2. Slip bag inside lining, matching side seams; pin. (The flap, swivel hook, and strap are sandwiched between bag and lining.) Sew upper edges together.
  3. Turn bag right side out through opening in lining bottom. Slip-stitch opening closed. Insert lining into bag. Press upper edges of bag.
  4. Sew button on bag front

February 06, 2013

Create your Own Personal Notes!


Personal Notes

Here is an easy idea...Design your own stationery using lace and doilies as inspiration.   They are very easy to do and materials are easy to find, just look for vintage handiwork at thrift stores, estate sales, even at craft stores such as Jo-Ann.  Small crocheted coasters are perfect and can decorate pre-made plain paper cards; you can dye one black for a graphic look, and use quick-drying crafts glue to adhere it to cardstock or a note card. 
You also can use the crochet and lace as stencils. Dip a stencil brush in acrylic paint and use a pouncing motion to apply it over the lace; remove the lace to leave the pattern behind. Use paper doilies from the wedding-supply aisle of the crafts store or lace-pattern decorative tape for other quick adornments.


February 04, 2013

Embellish your Old Pillows and Create a New One!


Flowered PillowsEmbellish a plain store-bought pillow or an old one with funky felt flowers. Cut simple five-petal flower shapes from felt in various colors, then layer several graduated sizes to make one flower. Using a needle and thread, stitch through the centers of the flowers to tack them together. After you have created about a dozen flowers (or more for a larger pillow), stitch them to the pillow surface, bunching them tightly together to create three-dimensional blooms.


My Tip: Thick, stiff felt works best for blooms that won't wilt, but you can cut flowers from any fabric that doesn't fray, such as fleece.


 Jackie


February 03, 2013

Today was a Busy Day!


Like many of you Saturdays are crazy..Full of errands and too little time to finish all of them!  Today my day started very early...My 1st task of the day.. photo club ..I need to admit..It was  a lot of fun!...my Photo Club Meet-up today was all about Cameras in your Smartphones and Antiques around town!  and My town is perfect for that..so much history around here! we used the Camera + and Simply B&W apps! they are great for quick photos a snap ! take a look

B&W pursues !

Eclectic Stuff
Baby Vintage!


After Photos! I ran to Michelle's..as I forgot my other iPhone at the store the night before! Ohh No!!  total panic! LOL...got my phone and ran to get groceries...ran home make dinner and put away all the groceries (hate that part!) ...done with that... and ran to my sewing class  (Yea! Im trying to learn...but just don't get your hopes to high..Im at a very beginning level! LOL...And finally to close the day...2 hrs conference call with Gals from Women Ministry!.....I was totally exhausted !!  But it was a good and productive day!...It was a good day!  Will see how it go next week! ;)


look for more!

Related Posts Plugin for WordPress, Blogger...